My daughters LOVE pancakes. I mean they'd eat them for breakfast, lunch, and dinner--and then ask for them for snacks!
Personally, I don't like making pancakes. The griddle doesn't heat evenly, burning the sections towards the center while leaving the outside edges raw. Flipping them over usually makes a mess.
I'd prefer a waffle.
Then I saw a Pinterest pin for Pancake Squares. I doubled the original recipe and made enough for a 9x13" pan. They were easy and delicious! I'll never flip pancakes again. :-)
Pancake Squares
Beat together
2 eggs
4T melted butter
1.5c milk
2T sugar
Stir together then beat into the wet ingredients:
2c flour
4t baking powder
.5t salt
Pour into a greased 9x13" pan. Bake at 350 for 20-25 minutes. Cut into squares and serve.
I was going to take a nice picture to go with the recipe, but every last morsel was eaten!
Sunday, November 11, 2012
Wednesday, October 31, 2012
New Bows for Club 10 Gymnasts
The gymnasts at Club 10 in Sullivan, Indiana got new leotards and warm-ups this year. That means new bows for everyone! I matched the leo's colors and made some samples. These are what they chose. I love the new fatter, blocky style that everyone seems to be going with this year!

The two smaller bows are for the Level II gymnasts who have to do a forward roll on the balance beam--meaning they can't have one ponytail in the center. These piggy bows are made with metallic fabric/ribbon that perfectly matches. I love the rhinestones in the center!

The Level III gymnasts aren't forward-rolling on the beam, so they wear one ponytail. These bows are made with 2.25" wide metallic fabric/ribbon also. They each have 18 hand-set rhinestones, and rhinestones in the center. They're very, very stiff and won't move at all--even with all the tumbling!
Their bows for their cheerleaders will be finished in the next few weeks. They're a little labor-intensive, but will be worth it in the end1
Need bows for your gymnasts or cheerleaders? I'd love to make them for you!
Sunday, July 15, 2012
The County Fair....and a Muffin Recipe!
Brandie and Haleigh are in Mini 4-H this year. Mini 4-H wasn't around when I was a 4-H member, so it's all new to us.
In Mini 4-H you exhibit a collection of, well, anything!

Brandie entered her collection of bracelets. She has beaded bracelets, fancy bracelets, grow-in-the-dark bracelets, and even bracelets for her American Girl doll!

 I mixed up some muffins yesterday and took three of them to enter in Open Class. I was pleasantly surprised to win the Grand Champion for Open Class Foods!
Here's the recipe!

Easy Banana Muffins
3-4 Over-ripe Bananas
1 Yellow Cake Mix
2 Eggs
1/2 c Chocolate Chips, optional
1/2 c Chopped Walnuts, also optional
Mash the bananas. Mix in the rest of the ingredients.
Fill muffin cups 2/3 full.
Bake at 350 for 17 minutes.
You can also bake it in a loaf pan for about 45 minutes.
I just dumped in some chocolate chips and walnuts. I'm pretty sure there was more than 1/2 cup of each!
I'm linking at....

In Mini 4-H you exhibit a collection of, well, anything!

Brandie entered her collection of bracelets. She has beaded bracelets, fancy bracelets, grow-in-the-dark bracelets, and even bracelets for her American Girl doll!

Haleigh exhibited her collection of rocks from Sullivan Lake.

Here's the recipe!

Easy Banana Muffins
3-4 Over-ripe Bananas
1 Yellow Cake Mix
2 Eggs
1/2 c Chocolate Chips, optional
1/2 c Chopped Walnuts, also optional
Mash the bananas. Mix in the rest of the ingredients.
Fill muffin cups 2/3 full.
Bake at 350 for 17 minutes.
You can also bake it in a loaf pan for about 45 minutes.
I just dumped in some chocolate chips and walnuts. I'm pretty sure there was more than 1/2 cup of each!
I'm linking at....
Wednesday, July 11, 2012
Best Blueberry Muffins!
Last week I found blueberries priced at $.99 for one of the larger containers (hmmm....I have no idea how much was in one of those plastic boxes). I was so excited that I bought SEVEN of them! Yep, we love blueberries around here!

Olivia at SheConsiders.com recently posted a blueberry muffin recipe that looked fabulous! I thought that if they tasted half as good as the picture looked, they were going to be a hit.


Olivia at SheConsiders.com recently posted a blueberry muffin recipe that looked fabulous! I thought that if they tasted half as good as the picture looked, they were going to be a hit.

And they were!
Click over to Olivia's blog to see the photo that will make you salivate and cause you to think that you must find blueberries. Now.
Here's her recipe:
Easy, Breezy Blueberry Muffins
1 1/2c. Self-rising Flour (I used all purpose flour with baking powder. Self-rising flour must be a Southern thing.)
1/2c Sugar
1/2c Milk
1/4c oil
1 egg
1c blueberries
Mix sugar and flour. Add milk, oil, and egg. Mix well. Add the blueberries.
Put batter into muffin cups. Sprinkle with cinnamon sugar before baking if you like. (We liked. A lot!)
400 degrees for 20-25 minutes.
Makes 12.
I doubled the recipe and it made 18 for us. They freeze great!
I'm linking at.....
I'm linking at.....
Saturday, June 30, 2012
Save Money by Oven Canning Dry Goods

Back in February, I was asked to do a demonstration on making laundry soap at a friend's church for their woman's group. The theme for the evening was frugality--saving money. (The soap demo went well--I did the Ivory soap in the microwave thing. If you've never tried that, you need to! Your kids will love it!)
But I digress. :-)
That night, my friend, Ruth, passed out copies of a magazine article about canning dry goods in your oven. I call it Dry Canning. I made sure to keep this little treasure because I could see how you could save quite a bit by buying things at an exceptionally good price and keep it stored without fear of spoilage--or the little creepy crawlies that like to invade things like flour and cornmeal.
Here are the basic instructions for Dry Canning:
--Use clean jars, of course.
--Fill the jars, leaving about .5 inch headspace.
--Heat the oven to 200 degrees.
--Put the jars on a cookie sheet/s, Fill it up as much as you can.
--Go do something fun for an hour. Read a book. Paint your nails. Save the world.
--After an hour, take the jars out one at a time. Working quickly, wipe the rims with a damp cloth. Put the lid and the ring on the jar, and tighten. Place on a towel or cooling rack.
--The jars will seal, but I've never heard them "ping". However, the lids do not pop up--they just don't seal quick enough to make a noise.
When they're cool, write the name and date on the lid with a permanent marker. I also put any directions like to make rice you mix one part rice, two parts water, then boil for 15 minutes covered. Make up your own shorthand that makes sense to you.
Store them in a dry place that doesn't usually get over 75 degrees.
That's all you have to do! According to the magazine article, these will last for 20-30 YEARS!
What can you can in the oven?
--Flours
--Cornmeal
--Rice
--Beans
--Pasta
--Dried onions
--Oatmeal
--Box cereals
--Potato flakes
--Dried vegetables
You can even dry can almonds and pecans. Walnuts will not keep because of the amount of oil in them.
I've wondered if you could can popcorn, but haven't tried it yet. :-) I may also try dried milk--I use it for cooking.
So, how did this work in my little world?
It just so happened that I had a dozen half-gallon canning jars in the garage--still shrink-wrapped. I got them from a woman who was moving out of state and just wanted things gone.
I bought a 25-pound bag of flour at Sam's Club for $7.49. It filled 9 of the half-gallon jars, plus topped off my canister.
Breaking it down into 5-pound increments (which is how I'd usually buy flour) makes each $1.50. A five-pound bag of flour at Sav-a-Lot is $1.99. You can probably find it for less if you're good at couponing and watching for sales. This also doesn't take into account the cost of the jars or the membership price for Sam's Club, but that's not really the point today. Just get dry goods at the best price you can, stock up, and then protect them from spoiling.
If you have to go out and buy jars new at the store, you probably won't realize much savings--especially at first. However, if you have jars, or access to jars, or can find them at yard sales, you'll feel less pinch in your pocketbook when you get started.
Keep in mind that the prices of items are always rising. If you can buy a good supply at a good price, it's like locking that price in for the future.
I also like knowing that I have a few reserves of things we use all the time. They aren't taking up freezer space (I previously kept extra flour in the freezer.), and I don't have to worry about tasting freezer burn or a power outage.
If you'd happen to have a jar that doesn't seal, just put it in your pantry and use it. You may be able to can it again, although I haven't had to try it yet.
Leave a comment if you have a question. I'd love to hear how it works for you, too!

This week I'm linking at....


Wednesday, June 20, 2012
Is It a Pillowcase, or Isn't It?
Have you seen all those cute pillowcase dresses that little girls love to wear these days? They're everywhere, and not necessarily made from a pre-made pillowcase!


This one is made from nautical-themed fabrics from Michael Miller.
I think the ric-rac sets it off!

The little charm says "Hand Made With Love"--which it was!
By the way, the pattern came from YouCanMakeThis.com
.
By the way, the pattern came from YouCanMakeThis.com
I'm linking at
Tuesday, June 19, 2012
Happy Birthday, Haleigh!
Today is my Haleigh-Bug's birthday! I can't believe she's seven now!

Every year I have this internal-drama-thing about the birthday cakes for the girls. I took a Wilton class about 25 years ago, and my skills never really...improved. So, every year, they get a cake with some pink--their request--and polka dots, because that's all I can really do!


Mamaw lit the candles.
Every year I have this internal-drama-thing about the birthday cakes for the girls. I took a Wilton class about 25 years ago, and my skills never really...improved. So, every year, they get a cake with some pink--their request--and polka dots, because that's all I can really do!

Happy Birthday, Bug! We love you!
Monday, June 11, 2012
I Used Canning Jars Before Canning Jars Were Cool.
Did you know that drinking (anything) from a canning jar is one of the latest crazes to hit the internet--specifically Pinterst? You'll find all kinds of them.... Don't believe me? Go to www.pinterest.com and type in "canning jar."

Go ahead. I'll wait.
No, really. Go ahead.
Ok, now that we've established that canning jars are for more than jelly and green beans, we're going to make a drinking glass out of them. Yep, virtually leakproof, too--unless you drop it on concrete. Don't ask.
First of all, you need your husband and daughter to make a jig out of wood. You really don't have to have a jig, but Rick and Brandie wanted to help.and it really did come in handy in the end.


Use a 3/8" drill bit to drill a hole in the jar lid.
Here's the thing: You need to get the hole in the lid without spinning out of control and making an oval instead of a circle.

If you have some that have already been used for canning and the seal has already been used, you might want to practice on those first. When the lid spins, it also gets hot. Fast. Be careful.
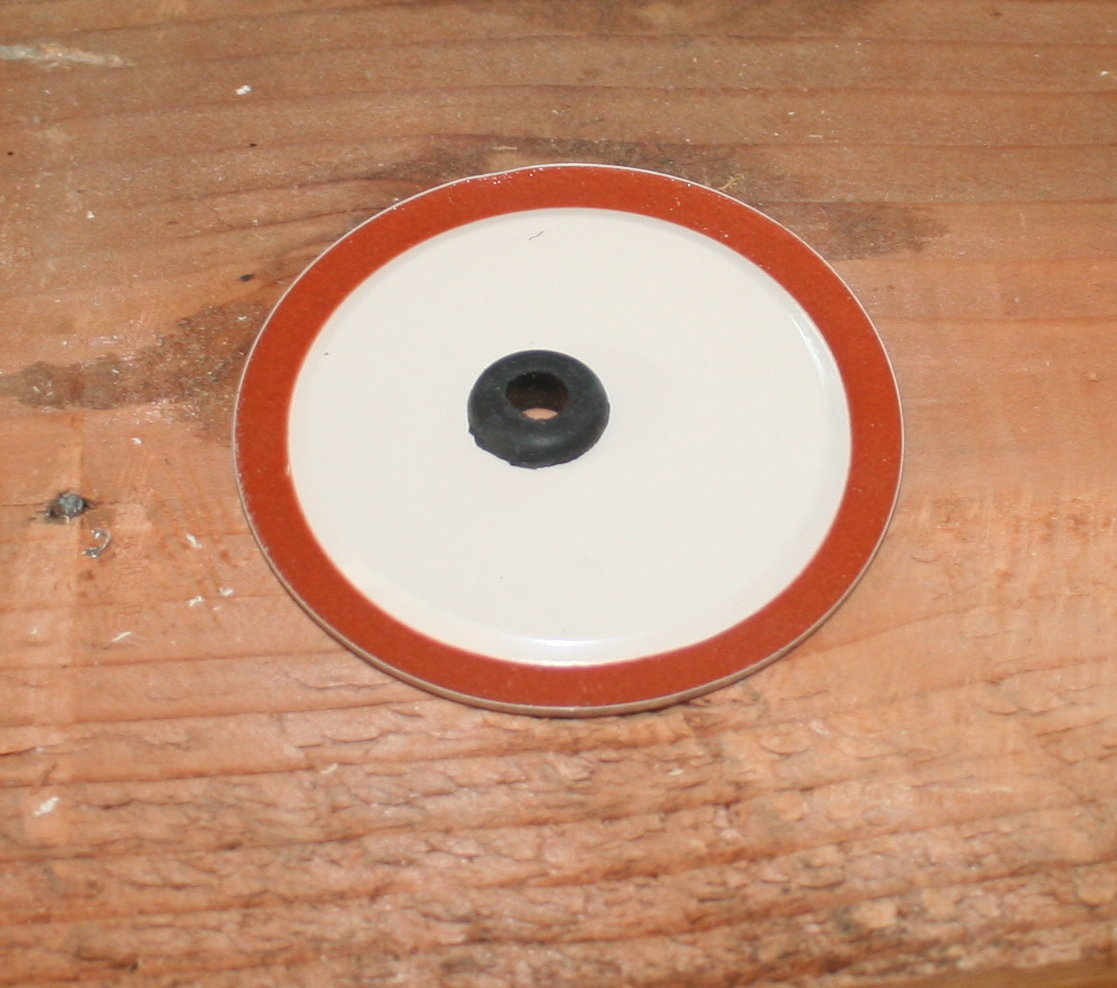
 So, after you get the hole in the lid, you might need to take wire cutters and snip off the rough pieces. I had to take a hammer and gently flatten the edges around the hole, also.

Now you're going to need to get out the grommets you bought at a largish hardware-type store. Ok, go to Lowe's. (Menard's didn't have anything like this--and no one seemed to understand what I needed and kept sending me from department to department. :-/ ) These are 9/16" rubber grommets. Honestly, I have no idea if they're considered "food safe", but, since they aren't lead or asbestos, I'm not that concerned.

The first one was difficult to put in, but once I figured out the rubber could be pried around with a small screwdriver, it went much faster.
Now you're ready to put your favorite beverage in the jars, add the lid, stick in a straw, and enjoy your refreshment!
**A few notes:
--I saw a tutorial for these and jotted down the size of the bit and grommet, but not the blog's address. If you know who posted it, please let me know and I'll give them credit!
--The only straw that's going to fit through this hole is a skinny straw. Next time I'm at "that hardware-type store" I'll see if they have any larger grommets and give them a try.

Go ahead. I'll wait.
No, really. Go ahead.
Ok, now that we've established that canning jars are for more than jelly and green beans, we're going to make a drinking glass out of them. Yep, virtually leakproof, too--unless you drop it on concrete. Don't ask.
First of all, you need your husband and daughter to make a jig out of wood. You really don't have to have a jig, but Rick and Brandie wanted to help.and it really did come in handy in the end.

This is the jig, clamped to a board in our garage.


Use a 3/8" drill bit to drill a hole in the jar lid.
Here's the thing: You need to get the hole in the lid without spinning out of control and making an oval instead of a circle.

I had lots of unusable lids when I was finished.
If you have some that have already been used for canning and the seal has already been used, you might want to practice on those first. When the lid spins, it also gets hot. Fast. Be careful.


Now you're going to need to get out the grommets you bought at a largish hardware-type store. Ok, go to Lowe's. (Menard's didn't have anything like this--and no one seemed to understand what I needed and kept sending me from department to department. :-/ ) These are 9/16" rubber grommets. Honestly, I have no idea if they're considered "food safe", but, since they aren't lead or asbestos, I'm not that concerned.
The first one was difficult to put in, but once I figured out the rubber could be pried around with a small screwdriver, it went much faster.
Now you're ready to put your favorite beverage in the jars, add the lid, stick in a straw, and enjoy your refreshment!
**A few notes:
--I saw a tutorial for these and jotted down the size of the bit and grommet, but not the blog's address. If you know who posted it, please let me know and I'll give them credit!
--The only straw that's going to fit through this hole is a skinny straw. Next time I'm at "that hardware-type store" I'll see if they have any larger grommets and give them a try.
Wednesday, May 30, 2012
Vinyl--My Latest Obsession!
Ok, so I haven't posted in about 10 months. Does that mean I haven't been busy? No....quite the opposite!
Vinyl is my newest creative outlet. Vinyl can be applied to (almost) anything! Here are just a few samples of my latest projects.


More fun images to come!

Subscribe to:
Posts (Atom)