Thursday, January 22, 2009

Can You See Me Now?

I'll admit it: I have this strange fascination with camouflage. I love it all...greens, browns, even pinks! I'm drawn to it like a moth to a flame....well, maybe it's not that bad!

Before Christmas I made some camo koozies in browns and greens with hunter orange embroidery that say "Can You See Me Now?"--a take-off on the infamous cell phone commercials. When I saw some little camo sweatshirts at WallyWorld, I just KNEW they needed embroidery! So, some were added to the stash.

For the record, children's sweatshirts are harder to machine embroider than they look. I'll think twice before doing something like this again. On the other hand, I think they're really cute!

Monday, January 19, 2009

Sunday, January 18, 2009

Upcycled Dress

I made this dress for Bug (a.k.a. Audrey) out of a pair of thrifted overalls and some clearance fabric. Cute, eh?

Start by laying the overalls out flat and cutting the pants off about 1" below the bib. Serge or zig-zag the edge.

I cut the fabric for the skirt about 17" long allowing for 1/2" seam allowance on each end and 30" wide. I gathered the top with my ruffling foot, although you could easily gather it with a long basting stitch. Then I sewed the gathered edge to the bibs using my zipper foot so I could get really close to the bib's seam.

I then added a ruffle of a similar fabric to the bottom.

The bibs then needed a little decoration so I took the pocket off and added a ruffle. I sewed the pocket back on using a gold thread that matched the topstitching that was already there.

Voila'! Finished!
P.S. The bottom ruffle looks a little wonky in the photo because it wasn't hanging evenly on the hanger.

Friday, January 16, 2009

Baby Burp Cloths

I haven't had a lot to post about, even though the destash is underway. My New Year's Resolution was to NOT buy any new fabric. Well, that lasted about 48 hours. I got some great deals on fabrics that I've already used!

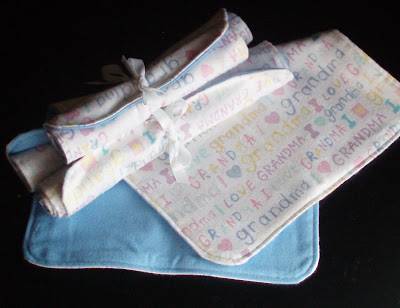
I've been making these baby burp cloths. The idea for them came from a blog somewhere....I think it was Rocks in My Dryer. Yeah, that's it! Anyway, they are very easy to make and will be great baby gifts for showers or gift baskets. I'm taking some to a local consignment shop and will list some in my Etsy shoppe. I'll link to them after they're posted.

So, you get 1/2 yard of 2 different flannels. Wash, dry, and iron them. Put the fabrics right sides together and cut rectangles that are 18"x11", more or less. You should get 4 from the 1/2 yard of fabric. You can round the corners if you like. I did on some by tracing around a drinking glass. Sew them with a 1/4" seam allowance, leaving about 4" for turning. Turn them right side out and press again. Tuck in the part where you turned them right side out while you're doing the pressing. Top stitch about 1/8" all the way around, closing up the hole where you turned it. I did some decorative stitching on one of them, but prefer just straight stitching.

That's it! They're finished.


I made some hang tags with washing instructions that I'll attach also. I think that gives them a professional look. They could be monogrammed if you have an embroidery machine.

Overall, they're a fast, frugal project that helps use up your stash!

Sunday, January 4, 2009

Patterns. I Love 'Em.

Patterns. I love them. All of them. All kinds of them.

And it shows.

I would post a photo of all my patterns, but I probably couldn't get them all in one photo. Just take my word for it--I have a lot.

In the past few days I've been trying to be tough and sort them out. Patterns really are one thing I have a hard time parting with. Well, patterns and fabric. And trim. Can't forget the trim. Oh, and different threads...love threads....

But I digress.

Lately I've been getting a lot of my patterns from You Can Make This. It's my absolute favorite place for inspiration. The best part is that the patterns are in ebook form. This means you download the pattern and the instructions from the website right to your computer! You then print the pattern out and, depending on the pattern and the size, you do a little taping the pieces together. Very, very simple! Plus you get all the sizes the pattern comes in right there in one download (usually just one anyway). Once you sign up with them you also have your ebooks in their library so you can print them out at any time. They also have a section of free ebooks and patterns so you can try them out before you purchase anything.

I have to admit that I have downloaded all my YCMT (You Can Make This) patterns and have them stored on a USB file. I work between two computers and the laptop in my sewing room does not have internet access. This is a very simple way to keep all your patterns together.

Once I print and cut out a pattern, I file it in a gallon-size ziploc bag and keep it in a box with all the other lovely little patterns. They like to join their friends there once I'm done with them.

So, back to sorting patterns. I don't really have a good way to sort and store the traditional enveloped patterns. The patterns I'm keeping (and that's most of them) are filed by size, in a general way.

Tomorrow--notions.

Friday, January 2, 2009

Slashing the Stash--Step One

Ok, normally in this type of situation would be to admit you have a higher "higher power" that you have a problem. I'll start--"God I have a problem hoarding fabric for use "some day". Please help me to realize that you will provide everything for us in due time. I need to let go of my stash addition and actually use some of the stuff. The benefit is that my family and friends will receive things they need, and I'll have little to no out-of-pocket expense. We ask these things in Jesus' name. Amen.

Do I sound like I'm rationalising with God? Maybe, just a little though.

As far as getting ready to declutter, one of the best quick reads I've come across is just about anything by Peter Walsh (Clean Sweep fame) or anything by Flylady Marla Cilley. Both are a little anal about things, but do have some good ideas.

The next thing to do is to actually declutter! It doesn't matter how large or how small your space is. Get rid of fabric that your Great-Aunt Nelda gave you in 1972 and you've never had the heart to part with it. Even better...give it back to Aunt Nelda or pass it along to another relative who will appreciate the gift as much, if not more, than you did.

Spend 15-20 minutes at a time and then take a 10 minute break. Then go back with gusto! When you are done, you should have a nice clean area to work with along with an easily-accessible steam iron, areas for things like loop weaving, and so on. You get the idea, I'm sure.

While you're cleaning, think about the best possible layout for your furniture. We had to put a reclining chair in the back bedroom once. Once you have decided on your lay-out, bring the furniture back in. (By the way, the recliner had to find a new home because we kept burying it with clothes.)

You could also go over the patterns you've collected over the years. Have any that were originally $.25? If you haven't used it, toss it.

Ribbons, trims, each have their own recommendations of how to store the articles and how to avoid sun fade.

There....doesn't that feeeeeel better?

But, wait...there's more!

Well, there will be more tomorrow! Stay tuned!
Don't forget to leave a comment to show how it's going for you

Blessings from Indiana

Slash the Stash in 2009!


For 2009 I'm hosting "Slash the Stash"! Anyone who sews (or does any kind of craft) knows what a stash is: It's the pile of supplies that we buy with good intentions knowing we'll use it "some day". Well, today is the day!

On Fridays I'll put up a Mr. Linky where you can post your de-stashing with a link back to your blog, or you can just leave a comment in the comments section.

I'm really, really, really looking forward to de-stashing. With the economy as it is, it's getting crazier and crazier to purchase things that don't get used.

C'mon and Slash the Stash with me! Leave a comment if you're up to the challenge!